
Thursday, March 13, 2014
Kingmaking Students and indi developers....
My friends over at Kingmaker Games have been working with students from College of Richland in North Dallas to help them bring their games to the market place. This is so awesome I wanted to share what they are doing. Please go and support their efforts. www.kingmakergames.com
Saturday, March 1, 2014
How to build a Warhammer 40K Imperial Skaven Army
I have been working on my Imperial Guard army and someone wanted to know what my process was for building them. This is going to be a very long post with lots of pictures. I will try to make it easy to follow along, but if you have questions feel free to drop me a line.
NOTE: If you are not experienced with using Green Stuff then I would not recommend this project for beginners. It requires a lot of cutting, chopping, and altering expensive models and repairing them with Green Stuff. I will include some links for people who want to learn more about using green stuff and sculpting and moding.
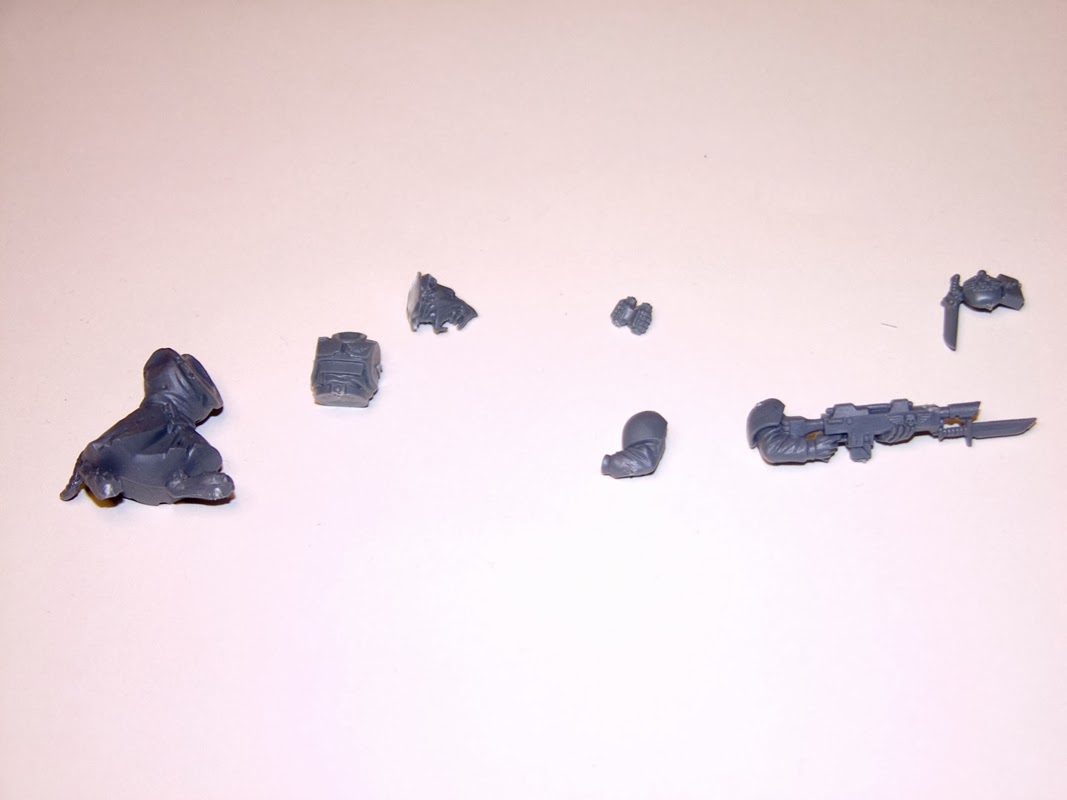
Step 1
Clean all parts of mould lines and place them on a clean work space so you can see them all clearly. In this image you can see I have a Skaven Body, an Imperial Guardsmen Torso and Arms. I also have Imperial Grenades and a Utility Pack that includes an ammo pack, a canteen, and a knife.
NOTE: If you are not experienced with using Green Stuff then I would not recommend this project for beginners. It requires a lot of cutting, chopping, and altering expensive models and repairing them with Green Stuff. I will include some links for people who want to learn more about using green stuff and sculpting and moding.
Step 1
Clean all parts of mould lines and place them on a clean work space so you can see them all clearly. In this image you can see I have a Skaven Body, an Imperial Guardsmen Torso and Arms. I also have Imperial Grenades and a Utility Pack that includes an ammo pack, a canteen, and a knife.
 |
| Clean all your parts. Its easy to brake your model if you have to clean it later. |
Step 2
Next I cut the Skaven torso off of the bottom half of the Skaven legs. Its very important you don't cut the tail off or you will have to add a new one (unless you don't want tails, then by all means chop them off).
I try to make sure that I cut the just above the belt line at a slight angle with the higher point at the back. This helps to give the model the hunched over stance of the Skaven. If you cut it too straight, not to panic. If its a guardsmen that will be in a big group, you can leave it as is. This will help the model to brake up the unified look of the squad a little bit. If its a special unit like a commander then you can just use a little Green Stuff to build up the back side a bit.
 |
| Make sure the cut area is flat so gluing the torso will not cause problems later. |
Step 3
Once you have the legs ready you can glue on the human torso. You shouldn't need to pin it but depending on how clean your torso cut is you might have to.
The Skaven head may need to be trimmed down a bit. This head had a lot of extra plastic for a cloth collar that was going to make positioning the head difficult. I used my snipers to trim it back and an XACTO knife to smooth it out.
In this case I wanted the Skaven with a hard look to the left so I had to pin the head. I used a small piece of a paperclip but you are free to use anything you want.
 |
| The Skaven Guardsmen is starting to take shape. |
Step 4
Adding the arms works almost exactly the same as when you built Imperial Guardsmen with one or two small exceptions.
The head of the Skaven extends out over the torso in a way that it might block the arms that you have chosen. Make sure to do a dry test with a few small blobs of Green Stuff first. Just add a couples of tiny green beads and stick the arms on to test it. Keep doing this until you find a pair of arms that work then glue them in place.
 |
| I chopped down the barrel of the Las-gun. The small size of the Skaven makes the longer barrel a problem sometimes |
 |
| You can fill the waist with green stuff if you want but you don't have to. It will get covered later. |
Step 5
Sometime you might have to cut the knife (or ammo clip) off of the utility belt object. Depending on what Skaven model you are using you might or might not have to do this.
Very carefully use your XACTO knife to cut along the edge of the canteen. Be careful not to cut off the knife's hilt or the detail of the handle. One you have it you can clean the rough edges and shave down the back side of the knife (There will be some extra plastic that might make the knife sit at an odd angle if you don't don't this). NOTE: Don't cut yourself!
 |
| This can be tricky. The key is to take your time. Working with small items like this is also an easy time to cut yourself so be extra cautious. |
Step 6
Gluing the Utility items in place is simple enough. Just place them where they work best and look good. Try not to put them at strange angles unless the Skaven leg is bent in away that will make it lay that way.
 |
| In this case I could have placed the Grenades a little higher and more to the right over the tail to cover that gap. |
In this next image you can see the small blob of blue. This is the blue half of the yellow and blue mixture that makes Green Stuff. I was using it in these pictures to make the model stand without a base. If you have a tricky model that you have trouble finding a good spot on your base, this is a good trick for positioning your model on the base before gluing it down.
You can also get a really good view of the Pin that is holding the head to the neck. I am going to fix that with some green stuff in the next section.
 |
| The knife is angled along the direction of the legs motion. This helps the illusion that this is part of the model. |
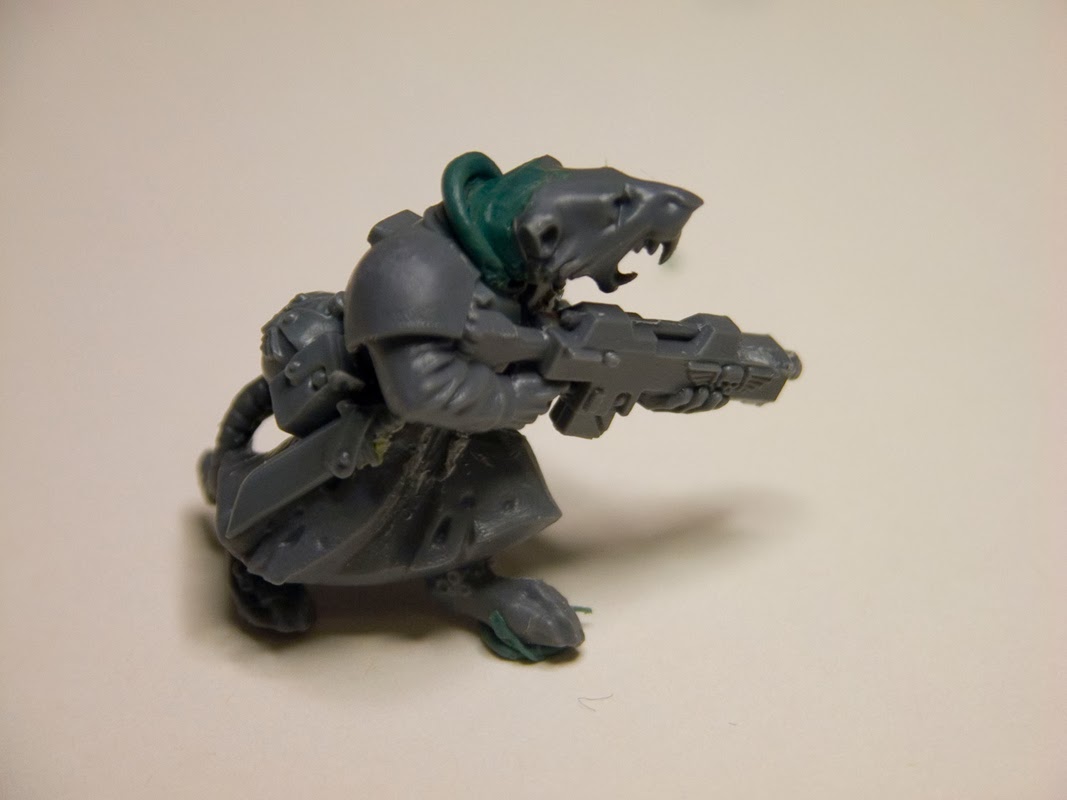
Step 7
The Skaven is almost done. One last thing to do is fill that neck area with some green stuff. Roll a small blob into a tube and wrap it over the neck. Use your sculpting tools and gently push the green stuff in and stretch it down to make a corner meet with the Imperial Guard torso collar.
 |
| Its looking a little lumpy. Not worry, we will shave some of that off and smooth some of it over the head. |
With the main area filled its time to smooth it out and make it look good. The Imperial Guard collar has a hard obvious edge. We want the Skaven flesh (or fur) to look like its going down under that collar. Make sure your sculpting tools are wet so they don't stick and make it look good. This Skaven head happens to have a skull face and head so I made the back of the head smooth to match the rest of it.
 |
| This is just about done. |
Step 8
I decided that It looks a little plain so I decided to add a larger collar to the neck area. I took some left over Green Stuff and rolled it out long and thin then draped it along the color line. I tucked the corners in on each side to help it stay in place while I shape the it.
 |
| That looks a little too big. Lets flatten that out. |
With a wet sculpting tool I pressed the roll flat. Being very delicate I pushed the rounded edge to make it a little sharper. I wanted it to look like the collar of a trench coat so I didn't smooth it down into the Imperial Guard neck cloth area.
 |
| This guy is ready for a base. |
Finished
That's it! Prime, base and paint as you normally would. From start to finish this takes me about 10 minutes (after removing the moulding lines) to cut and build one of these guys. feel free to drop me a line if you have questions and I will do my best to help you with some advice.
Happy paining!
 |
| All finished and ready to paint. |
Subscribe to:
Comments (Atom)