Monday, June 2, 2014
Kickstarter is an investment
Hey everyone. As we approach the launch of the Kickstarter I wanted to talk about what it means to be a Kickstarter. I have had several conversations with friends and strangers about Kickstarting projects and thought I would share my thoughts on the subject.
I believe in helping out the little guy. Giving him a chance to step up and get his game made. That idea is what lead me to build my company Kingmaker Games. Its all about helping the little guy. The guy who doesn't have a shot on his own. The team that doesn’t have the funds to get it made. The friends working out of their garage who could’n’ make it any other way. Give them a chance at doing something different. Maybe even take on some of the big guys who have all the money and marketing clout.
I am a believer and a backer of Kickstarter. I have backed 38 projects, all of them in the Games category. In most of those cases I backed the little guy. There are a few well funded projects, but for the most part they are all indi developers. Games that would never have been made without some help.
I have had a few conversations with people who take the stance of a customer and here are some of the anti-Kickstarter comments I have heard. Saying things like “Ill buy it when it out in the store”. Or “I would give them money if I thought they had a chance”. “I don't believe in Kickstarter because they should only be able to make it if they can pay for it themselves”.
Is Kickstarting is a risk? Yes! Its scary to give your money to an idea and never know if you will get a return on your investment. Maybe they might fail. Maybe they don’t make something that meets your expectations. Maybe their dream was grander their their abilities. But maybe, they will build something never seen before. Maybe you will help them build something out of reach for most people. And maybe, just maybe they will forge a path that the big successful companies dare not to tread because the financial risk is not in their Shareholders best interest.
In most cases I will never change the minds of these people with such a negative idea about Kickstarter. In their minds they have made their decision. They are locked in the old way of doing things and can’t escape the old brick and mortar ideology. But I hope I can convince a few people to not think that way. Because without a little help these games will never get made. You won't be able to buy it in the store. Without the funding they creators will have to get a job and may never have the time to build this new idea.
Without you, it will never exist.
Friday, May 30, 2014
The War Prime the game Announced!
The flood gates have been opened and War Prime is unleashed!

So the name WAR PRIME has been an idea I have had in my head for many years. It originally started as a 3rd person Action shooter strategy game. Think of something like the game Dynasty Warriors mashed up with Warhammer 40K. I designed it, wrote the world history, and there it sat for years waiting for a programmer to help me build it.
Two years ago I started playing Warhammer 40K again. While we were doing that one of my friends moved to Arazona. it got me thinking about all the people I use to play with and how I missed playing games with them. So last year I had the notion to make a digital tabletop war-game. This would allow me to play the games I like to play with my friends regardless of where they are in the world.

I started looking though my old design documents and came across Warprime. Well that game wouldn't work, but some of the ideas in there would. I used it as the foundation for this new game. Once again I designed it and this time found a small group of people to rally behind the idea. We got a prototype built but before we could get it ready to show to investors, my programmer vanished into the ether (the perils of working with people over the internet). Once again I couldn't find another programmer to pick up the mantel.
But this time it was different. I had spent to much time and money building this universe to just let it go. I looked at my options and thought I would look into how hard it would be to make actual miniatures. Looking at the cost of miniatures, manufacturing, and shipping I was astounded to discover how much money miniatures companies were overcharging.

For less than $1.00 worth of plastic a customer is charged $30 for a pack of miniatures. There are many reasons for this.
1. Shipping
2. Packaging
3. Store Markup
4. Advertising
But there is another factor that is less obvious. Competition.
There are many tabletop miniatures games. There are even many tabletop miniature war-games. But there is only one science fiction 25mm tabletop war game. This game doesn't need to be named. Without competition this game has become synonymous with the grim dark future of war and have stood at the top of the war game pile for many years. But without competition to keep them honest and hungry, they have become greedy. Without someone to challenge them they have run roughshod over the hobby and their fan bass. It is time for this to change.

I am going to push forward because playing without an opponent is against the rules.
So the name WAR PRIME has been an idea I have had in my head for many years. It originally started as a 3rd person Action shooter strategy game. Think of something like the game Dynasty Warriors mashed up with Warhammer 40K. I designed it, wrote the world history, and there it sat for years waiting for a programmer to help me build it.
Two years ago I started playing Warhammer 40K again. While we were doing that one of my friends moved to Arazona. it got me thinking about all the people I use to play with and how I missed playing games with them. So last year I had the notion to make a digital tabletop war-game. This would allow me to play the games I like to play with my friends regardless of where they are in the world.
I started looking though my old design documents and came across Warprime. Well that game wouldn't work, but some of the ideas in there would. I used it as the foundation for this new game. Once again I designed it and this time found a small group of people to rally behind the idea. We got a prototype built but before we could get it ready to show to investors, my programmer vanished into the ether (the perils of working with people over the internet). Once again I couldn't find another programmer to pick up the mantel.
But this time it was different. I had spent to much time and money building this universe to just let it go. I looked at my options and thought I would look into how hard it would be to make actual miniatures. Looking at the cost of miniatures, manufacturing, and shipping I was astounded to discover how much money miniatures companies were overcharging.
For less than $1.00 worth of plastic a customer is charged $30 for a pack of miniatures. There are many reasons for this.
1. Shipping
2. Packaging
3. Store Markup
4. Advertising
But there is another factor that is less obvious. Competition.
There are many tabletop miniatures games. There are even many tabletop miniature war-games. But there is only one science fiction 25mm tabletop war game. This game doesn't need to be named. Without competition this game has become synonymous with the grim dark future of war and have stood at the top of the war game pile for many years. But without competition to keep them honest and hungry, they have become greedy. Without someone to challenge them they have run roughshod over the hobby and their fan bass. It is time for this to change.
I am going to push forward because playing without an opponent is against the rules.
Thursday, March 13, 2014
Kingmaking Students and indi developers....
My friends over at Kingmaker Games have been working with students from College of Richland in North Dallas to help them bring their games to the market place. This is so awesome I wanted to share what they are doing. Please go and support their efforts. www.kingmakergames.com

Saturday, March 1, 2014
How to build a Warhammer 40K Imperial Skaven Army
I have been working on my Imperial Guard army and someone wanted to know what my process was for building them. This is going to be a very long post with lots of pictures. I will try to make it easy to follow along, but if you have questions feel free to drop me a line.
NOTE: If you are not experienced with using Green Stuff then I would not recommend this project for beginners. It requires a lot of cutting, chopping, and altering expensive models and repairing them with Green Stuff. I will include some links for people who want to learn more about using green stuff and sculpting and moding.
Step 1
Clean all parts of mould lines and place them on a clean work space so you can see them all clearly. In this image you can see I have a Skaven Body, an Imperial Guardsmen Torso and Arms. I also have Imperial Grenades and a Utility Pack that includes an ammo pack, a canteen, and a knife.
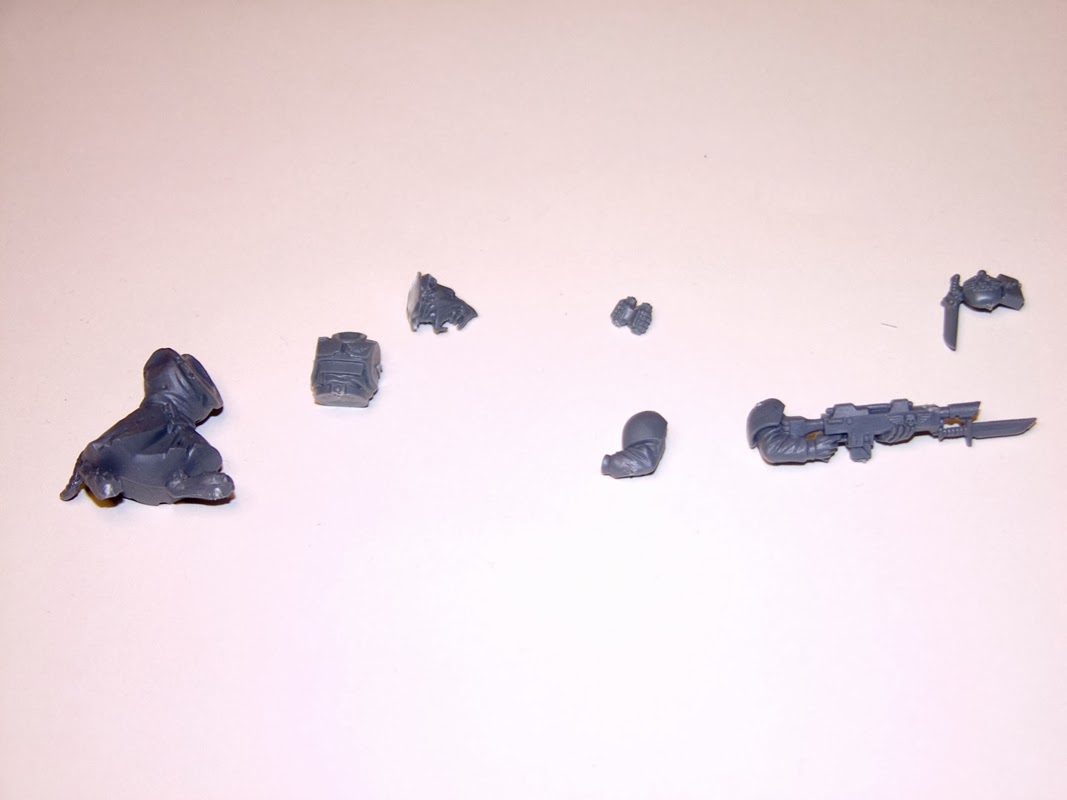 |
| Clean all your parts. Its easy to brake your model if you have to clean it later. |
Step 2
Next I cut the Skaven torso off of the bottom half of the Skaven legs. Its very important you don't cut the tail off or you will have to add a new one (unless you don't want tails, then by all means chop them off).
I try to make sure that I cut the just above the belt line at a slight angle with the higher point at the back. This helps to give the model the hunched over stance of the Skaven. If you cut it too straight, not to panic. If its a guardsmen that will be in a big group, you can leave it as is. This will help the model to brake up the unified look of the squad a little bit. If its a special unit like a commander then you can just use a little Green Stuff to build up the back side a bit.
 |
| Make sure the cut area is flat so gluing the torso will not cause problems later. |
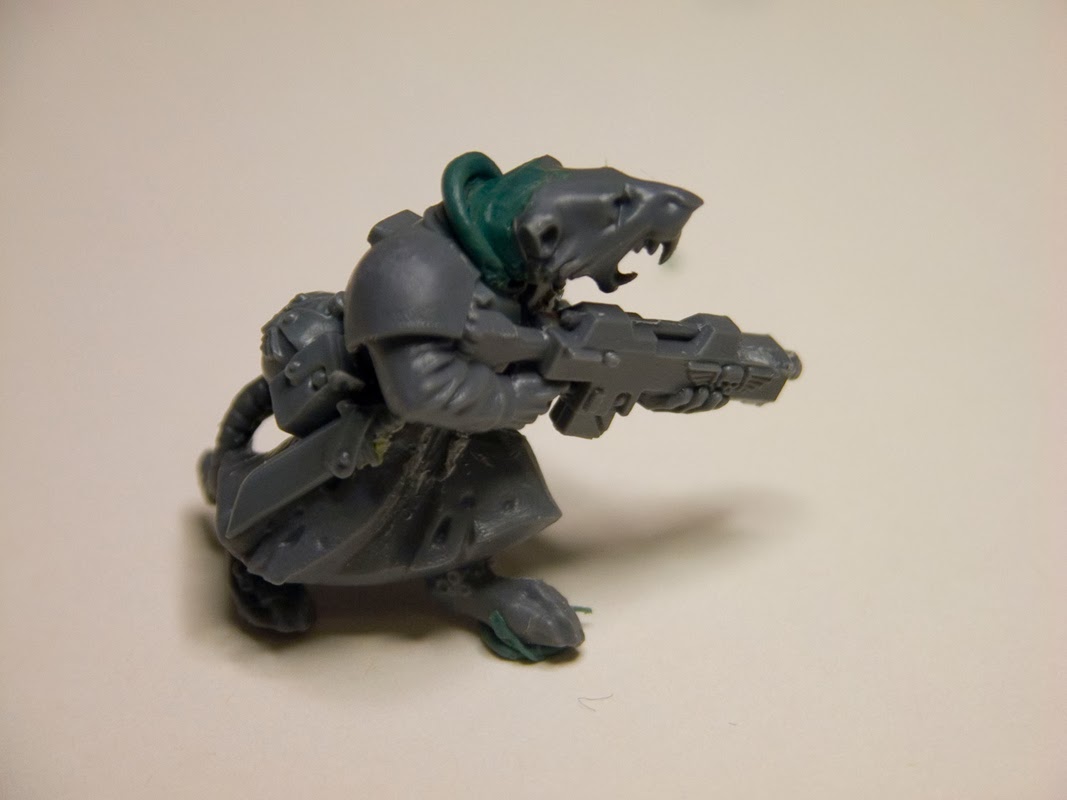
Step 3
Once you have the legs ready you can glue on the human torso. You shouldn't need to pin it but depending on how clean your torso cut is you might have to.
The Skaven head may need to be trimmed down a bit. This head had a lot of extra plastic for a cloth collar that was going to make positioning the head difficult. I used my snipers to trim it back and an XACTO knife to smooth it out.
In this case I wanted the Skaven with a hard look to the left so I had to pin the head. I used a small piece of a paperclip but you are free to use anything you want.
 |
| The Skaven Guardsmen is starting to take shape. |
Step 4
Adding the arms works almost exactly the same as when you built Imperial Guardsmen with one or two small exceptions.
The head of the Skaven extends out over the torso in a way that it might block the arms that you have chosen. Make sure to do a dry test with a few small blobs of Green Stuff first. Just add a couples of tiny green beads and stick the arms on to test it. Keep doing this until you find a pair of arms that work then glue them in place.
 |
| I chopped down the barrel of the Las-gun. The small size of the Skaven makes the longer barrel a problem sometimes |
 |
| You can fill the waist with green stuff if you want but you don't have to. It will get covered later. |
Step 5
Sometime you might have to cut the knife (or ammo clip) off of the utility belt object. Depending on what Skaven model you are using you might or might not have to do this.
Very carefully use your XACTO knife to cut along the edge of the canteen. Be careful not to cut off the knife's hilt or the detail of the handle. One you have it you can clean the rough edges and shave down the back side of the knife (There will be some extra plastic that might make the knife sit at an odd angle if you don't don't this). NOTE: Don't cut yourself!
 |
| This can be tricky. The key is to take your time. Working with small items like this is also an easy time to cut yourself so be extra cautious. |
Step 6
Gluing the Utility items in place is simple enough. Just place them where they work best and look good. Try not to put them at strange angles unless the Skaven leg is bent in away that will make it lay that way.
 |
| In this case I could have placed the Grenades a little higher and more to the right over the tail to cover that gap. |
In this next image you can see the small blob of blue. This is the blue half of the yellow and blue mixture that makes Green Stuff. I was using it in these pictures to make the model stand without a base. If you have a tricky model that you have trouble finding a good spot on your base, this is a good trick for positioning your model on the base before gluing it down.
You can also get a really good view of the Pin that is holding the head to the neck. I am going to fix that with some green stuff in the next section.
 |
| The knife is angled along the direction of the legs motion. This helps the illusion that this is part of the model. |
Step 7
The Skaven is almost done. One last thing to do is fill that neck area with some green stuff. Roll a small blob into a tube and wrap it over the neck. Use your sculpting tools and gently push the green stuff in and stretch it down to make a corner meet with the Imperial Guard torso collar.
 |
| Its looking a little lumpy. Not worry, we will shave some of that off and smooth some of it over the head. |
With the main area filled its time to smooth it out and make it look good. The Imperial Guard collar has a hard obvious edge. We want the Skaven flesh (or fur) to look like its going down under that collar. Make sure your sculpting tools are wet so they don't stick and make it look good. This Skaven head happens to have a skull face and head so I made the back of the head smooth to match the rest of it.
 |
| This is just about done. |
Step 8
I decided that It looks a little plain so I decided to add a larger collar to the neck area. I took some left over Green Stuff and rolled it out long and thin then draped it along the color line. I tucked the corners in on each side to help it stay in place while I shape the it.
 |
| That looks a little too big. Lets flatten that out. |
With a wet sculpting tool I pressed the roll flat. Being very delicate I pushed the rounded edge to make it a little sharper. I wanted it to look like the collar of a trench coat so I didn't smooth it down into the Imperial Guard neck cloth area.
 |
| This guy is ready for a base. |
Finished
That's it! Prime, base and paint as you normally would. From start to finish this takes me about 10 minutes (after removing the moulding lines) to cut and build one of these guys. feel free to drop me a line if you have questions and I will do my best to help you with some advice.
Happy paining!
 |
| All finished and ready to paint. |
Sunday, February 16, 2014
Where have I been?
Wow....what a long time to wait in between posts. Well my work on Borderlands 2 became busy enough that I really didnt have the energy to work on that and devote my free time to working on board games.
I had a lot of fun working on the Unity 3D Class stuff and then I started working on a few personal projects with that. Then my wife took a Job in Seattle and moved there late last year (October2013). After that my creativity just sort of lost any momentum.
In an attempt to get that back I have been getting back into painting miniatures. I took a bunch of pictures of my Necrons and posted them here:
http://hyboreal.deviantart.com/gallery/48191060
In addition I have started my long talked about dream project of building a Warhammer 40K Skaven army. This has been 15+ Years in the making. Here is a sneak peak:
Monday, May 13, 2013
Unity 3D Class
I have been taking an online class for Unity 3D. One of the other students asked me to shoe them how I did something in Unity and their Project Information section is not a convenient place to put a bunch of screen shots and info without making a big mess of my page. So for lack of a better option I am going to place it here on my Blog.
SkillShare Class: Week 2
Here we have an arial view of my Scene. I only decorated the area that the camera would be showing the player. The Soldiers that run by the camera are done in the worst way possible! To save time since I was so late to make the project deadline, I just duplicated him a bunch of times and lined them all up into the distance. If you wait long enough, they will run out and stop walking by. Next time I will figure out how to make the Soldiers die off screen and respawn and then I would only need 5-6 of them rather than 20.

Here is the FMS of the Clock. I have 4 directional lights (3 are turned off) for Dawn, Noon, Dusk, and Evening. When the Clock first is set, it is at Dawn and it sits and waits for a MOUSE CLICK. The iTweenRotate is set to rotate to the position of the current light, in this case the Light_Dawn.
Now that I have learned about how the Variables work (from Week 3 of the class) I think I would have used a Color Ramp and stored the Color Variable, then used that with the Set Color. This would have created a smooth blend of color instead of the harsh pop.

The scaling of the rock was a little tricky. I have an empty FMS that waits for a MOUSE CLICK. Clicking it goes to the next state where it will shrink to a scale of 0 over 3 seconds. It will then wait for 5 seconds before going to the next State where it will grown then then return to the Wait for Mouse Click state.

First off...this is all fakery! The King is not really "Walking"...he is playing an animation and he is moving, but its just an illusion. The King is already set up to use all of his animations so when you use the Play Animation Action, you are given a list that you want to run. I couldn't figure out how to make the Animation Loop, so I just had two FMS Nodes that bounced back and forth to each other. Then I just set the Controller Simple Move to a point in space off the screen to the Right and kept adjusting the speed so his feet didn't slide.


SkillShare Class: Week 2
Here we have an arial view of my Scene. I only decorated the area that the camera would be showing the player. The Soldiers that run by the camera are done in the worst way possible! To save time since I was so late to make the project deadline, I just duplicated him a bunch of times and lined them all up into the distance. If you wait long enough, they will run out and stop walking by. Next time I will figure out how to make the Soldiers die off screen and respawn and then I would only need 5-6 of them rather than 20.

Now that I have learned about how the Variables work (from Week 3 of the class) I think I would have used a Color Ramp and stored the Color Variable, then used that with the Set Color. This would have created a smooth blend of color instead of the harsh pop.


And here is the final scene with the Clock set to Noon. I also played around with the Screen Shake so when you press the space bar the screen will shake...also there is a tree that is not labeled that will shake and play a sound when you click on it.

Sunday, February 24, 2013
Something new is coming...
I have been working on a new personal game project. It's not a board game, but I could see doing a Card Game version of it. I have a really neat Dice Mechanic that could be a lot of fun to explore with this idea. I have been making good progress with the game design and I hired an artists to get some traction on the visuals. So far I would say that is has been going really well.
Here is what the Elite Unit started out as. On the right you can see my art direction making suggestions of the parts of the design I was not happy with.

The second round was much closer to what I was looking for. I didn't like the head design or the size, but for the most part that was it. There was a third version where I was still not happy with the head design, it was so similar to this version, its not worth adding another image. In the end Nick came up with this head design that I really like.
 The final version he added some darker shadows and additional details, but the major shape didn't change. The total time was about 2 days of back and forth emails (mainly because Nick lives in Greece).
I have been posting the final images to Facebook, but this is the first time I have talked about the Art Direction and the whole process. I have really enjoyed working with Nick. His rendering skill and ability to interpret my insane direction is amazing.
You can find the original posting here: Facebook.com/pages/Gorgon-Interactive
Here is what the Elite Unit started out as. On the right you can see my art direction making suggestions of the parts of the design I was not happy with.

The second round was much closer to what I was looking for. I didn't like the head design or the size, but for the most part that was it. There was a third version where I was still not happy with the head design, it was so similar to this version, its not worth adding another image. In the end Nick came up with this head design that I really like.

I have been posting the final images to Facebook, but this is the first time I have talked about the Art Direction and the whole process. I have really enjoyed working with Nick. His rendering skill and ability to interpret my insane direction is amazing.
You can find the original posting here: Facebook.com/pages/Gorgon-Interactive
Subscribe to:
Posts (Atom)